Sunday 28 April 2013

Another Baltimore Album block and other updates

Baltimore Album block 22 is done - a bold and wonky block. I feel I have to announce this every time for those that quite like wonky - and an apology to those who don't!


Carolina Lily quilt update:
 In my last post I moaned about my difficulty with curving the half inch bias for the stems (ugly bunching happening - am not going there).
The back basting applique is working very well for me as an alternative. Here's how I've been doing it...hope it doesn't bore you silly but I love seeing how other people do things - and the more pictures the better.
Marking the back of block and pinning fabric underneath - sorry bit dark

Basting the applique fabric to block background - from the back

Needleturn applique as basting removed - on the front

Rest of applique pieces pinned ready to sew down too
I can't believe how quickly these centre blocks are coming together now (they are rather large at nearly 12 inches across) but that's fine - won't get bored.  

Am still going on the Star Bouquet quilt (version of Mary Leggett's)  - much smaller pieces there but it is growing!


A few new stars added
                   

Tuesday 23 April 2013

Carolina Lily blocks - on trial

Fabric decision made! Here is the first block of my Carolina Lily quilt:

The print is the favourite
How did I come to this decision? After deliberating quite long enough about fabric choice I made two trial blocks in different yellows. Thanks so much for the comments and ideas received - this was a great solution for me! The yellow print stood out more than the yellow solid in varied lighting. This was a plus as the green is such a strong colour - don't want the yellow flowers to disappear. I also realise that I prefer the lemony yellow of the print to the darker gold of the solid.

The photo of the blocks together (below) is not a good photo - sorry. I can't seem to get a true colour and the print looks positively dirty. The photo above is much truer.

The two trial blocks

Block construction also needed deliberation ;)

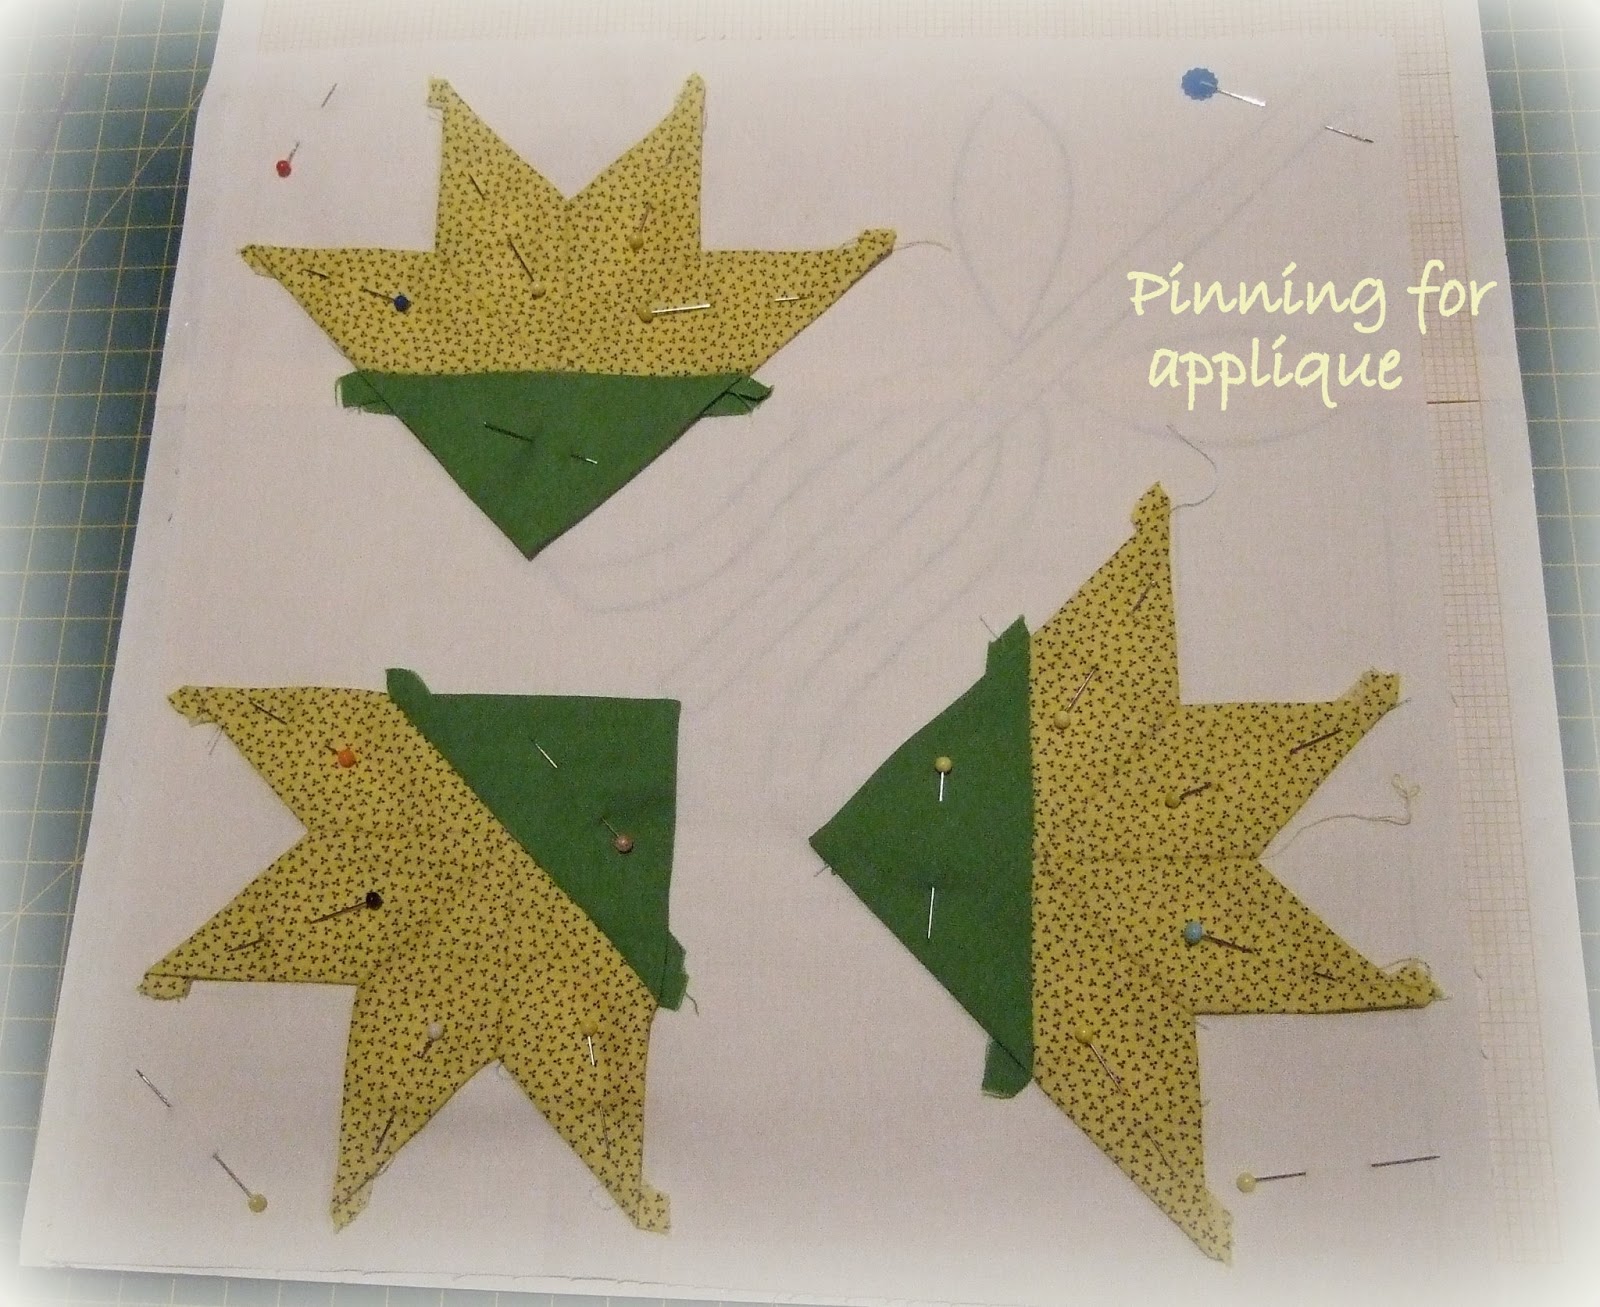
The pattern for each lily block (11 3/4 ") requires 28 individual fabric shapes to be pieced together (including background pieces), and then the stems/leaves to be appliqued on top. I don't enjoy this sort of piecing (am not at all good at it!) so had already decided I would just have a background square and applique the lot onto it.

To help with applique placement I made a block frame - with opening the size of finished block. Then I made a sketch of the block on graph paper - the placement sketch for the applique pieces. By laying the background fabric square over this, on top of a lightbox, I could make sure the pieces would be in the same place on each block (hopefully?!).


Next:  to make the flowers with English Paper piecing method:

For the stems I made bias tape:

Great tool for bias making
It is usually easy enough to applique this tape along curves but in this case the tape is half an inch thick - too thick to be very flexible -  and did not cooperate with the sharper corners (see below). I ended up with some ugly bunching on the inner curves ... not happy! 

Curved bias stems did not sew down well - not using this method
So - I reverted to my favourite method of back-basted applique for the curved stems, and saved the bias tape only for the centre straight stem. That worked well - happy now!

I'll post some photos of this method in progress next time. Am not having luck loading more photos today...sigh.

If you would like to see some precise piecing of a lovely Carolina Lily quilt have a look at
 Thelma's red Carolina lilies - all machine pieced and even machine appliqued - magic! She has included great photo instructions. 

Photo from Thelma's blog with permission - beautiful!

Saturday 20 April 2013

Carolina Lily

Making a start on this (yippee) ... "Carolina Lily" pattern in Quiltmania number 59
My photo of page in Quiltmania 72
First - the fabric selection and collection - just in case you are interested:
  • 10 yards of Kona Cotton Snow ( k001-1339) for the background - not too white, not too pink, and not too dark - happy with that, no problem.
  • 3 and 1/2 yards of green - a bit of faffing around involved here, but decided on the Poison Green from Vintage and Vogue (don't actually know the make of it - anyone know?)
  • 1 and 1/2 yards of yellow...LOTs of faffing around and still can't decide
The yellow semi-finalists - two solids and a tiny print
In the picture above : The very bottom yellow I do love, but have come to the conclusion the colour is not strong enough (bit too grey?) against the brighter green - so it is out. 

The finalists - almost
That leaves, in the picture above,  the final two yellow possibilities -
  • Pomegranate from Blue Hills with the tiny print, 
  • and a great solid yellow (from a local quilt shop but there is no label unfortunately). 
I have loads of photos of antique Carolina Lily quilts on my Pinterest board (been researching away!) and quite a few have a tiny print for the flowers - looks charming. 

Either of these last two yellows would be great I think ...any preferences ?

Amazing how much time is spent on the fabric decisions isn't it...but when there are only two fabrics playing around on at least 85 inches of background it would be quite sad to get sick of one part way through!!

Monday 15 April 2013

"In the Time of Toile" quilt finished

Found a spot for it on the wall...


I have been quite heavy with the machine quilting as this quilt is for hanging. My thinking is that it does not need to be soft and puffy (like my Lucy Boston Patchwork of the Crosses ) . I also wanted to add interest and another dimension with some geometric quilting.

Here are some photos taken in a different light to show up the quilting:


None of the quilting lines were marked on the quilt - just followed seam lines or free-motion stippled. But I wanted to make especially sure the lines on the Toile triangles (above ) were evenly spaced. I am not a fan of markers because I have made a mess of them before. So I thought I'd try a method I'd read about - using lines drawn on thin foundation piecing (or greaseproof) paper and sewing over it - seemed ingenious!?
                        Here goes...

Freezer paper cut to shape, lines drawn on, and pinned to quilt 

Machine stitched through quilt along lines using walking foot

Tearing off the paper to reveal lovely lines
All in all it went really well and I'd do it again. The tearing off is not too fiddly with straight lines. I'd be a little wary using it on a large area as the walking foot does not grab the top layer of fabric so there could be some movement (ie, puckering alert).

Thanks so much to Sue 's generosity with this kit. It was a great little challenge and lots of fun!

Here's a touch of autumn in the garden - the weather here has been just perfect recently.

Leaves on my Dogwood tree
And now ... I hear a new project calling... Carolina Lily (see end of the post in this link) starting soon ...so exciting!

Saturday 13 April 2013

Baltimore Album blocks 20 and 21

Two more Baltimore Album blocks done and they are very different....


Bit crinkled on the design wall!
I was panicking a bit worried when they were done that they may not go well together. One is so much "chunkier" than the other. So I hastily pinned them on the design wall to check.

I think/hope they'll be fine in the overall scheme. It has quite a mix of "chunky" and "delicate" blocks - remembering that these block patterns are borrowed from a variety of old quilts. 

Here is a trial layout again...
Pinned to my design wall/old sheet
That means only four more to go... and a little more embroidery to complete the blocks. 

Things to consider soon:
  • The border - there is no pattern in these packs for this. I am inclined to a simple pieced red/white border, single or double - maybe sawtooth or stepped. The blocks will end up trimmed at nearly 17 inches square ( and no sashing in between). So the quilt is going to be quite large - maybe 100 inches including the pieced border. A floral applique border would make it even larger.... There are so many beautiful ideas out there though aren't there?! 
  • The quilting - will be (sadly) by machine. I am thinking of a simple grid behind the applique. Am researching "quilt-as-you-go", block by block, because it would be so manageable, but haven't seen any done that way and it could look horribly wrong. 

Any thoughts ??

Saturday 6 April 2013

Inspirational quilts!

Photo from the book  Mosaic Quilts by the Charleston Museum

If you're anything like me your pulse will be going a wee bit faster now! And here are some more pictures to help it along...
Photo from 55 Famous Quilts from the Shelburne Museum
The photos are from two old  books that I just bought on ebay - and they are completely adorable. 
I started to mark them with sticky tabs but gave up as every picture needs a tab :  


They will find a special place among the rest of the 'family' - two groaning shelves of quilt history books. Most of these books have sticky tabs marking inspirational works. That kind of links to the end of my last post when I raved about my discovery of Pinterest - where "sticky tabs" are so nicely organised and accessible online. 

I now realise I must be about the last person on the planet to have discovered Pinterest - very slow on the uptake I know! So...that was me a week ago. 

Since then I have read various comments on different blogs about Pinterest and see that not everyone is happy with willy-nilly public pinning. Being a cautious type, I am taking that on board and am now being...well... cautious, in my pinning. Just by the way, I am only a hobby-quilter - no teaching, selling, publishing (apart from the blog) and have never entered quilts to win prizes in competition/shows etc - just obsessively driven to make and share quilts. It is wonderful to find that someone else is remotely interested - makes you me feel a little less mad doesn't it??

I know - Enough yabber!!     Here are more pics: 
From Mosaic Quilts the Charleston Museum
And to show I haven't just been looking at Pinterest ....some progress pictures: 
Next Baltimore Album block nearly finished

Quilting progress on my In the Time of Toile quilt

Autumn has arrived - needed gloves on the morning walk today - brrr. And, in the garden, the Golden Ash is dropping leaves fast :


Talk soon :)

Monday 1 April 2013

Quilt tour part three... and a discovery

A few more quilts around the house just to complete my little tour.

Here is my version of the Sarah Morrell quilt hanging on the wall in the family room - completed in 2012 using Di Ford's wonderful pattern:

Sarah Morrell quilt - version of Di Ford's pattern


There are also more photos of individual blocks here on a previous post.


Hanging in my entrance way is the Folk Art Basket quilt. It is my version of Karen Cunningham's reproduction pattern and was made in 2011/2012.  It was just such a pleasure to make this one and got me well and truly hooked on English Paper piecing and fussy cutting techniques.
Folk Art Basket quilt - Karen Cunningham class


Folded away at the moment  ( spot it on the shelf?) is my red and white Mariner's Compass - made in 2010 in classes with Chris Jurd. It is foundation paper pieced and appliqued, and machine quilted - see this post for a closer view. It was a real eye-opener to discover foundation paper piecing too.

Mariner's compass variation - class with Chris Jurd
The next one is folded on a bed - machine pieced and hand quilted in 2007. It is my design made in my daughter's choice of largely Japanese fabrics. 

Japanese fabric quilt

****   End of tour!   ****

Hope you have all had a lovely Easter - loaded with chocolate and Easter buns like me! 

And the Discovery?
Over Easter I've also been flat out discovering Pinterest. My daughter highly recommended it and showed me the ropes. Wow ...what a marvellous time-waster but such a useful resource for organising quilting ideas ! I have put a link in the margin to my Pinterest collections in case you might like to look - but I think you may have to be a member ...