Showing posts with label Clamshells. Show all posts

Wednesday, 30 March 2016

Wheat and Woods

Hope you all had a relaxing Easter - with lots of stitching opportunities!

I've been a bit remiss posting about my Wheat and Woods quilt - not since the beginning of December - but the borders have been steadily growing. 

Once I had attached the side borders, then I needed to draw a pattern for the corner - nothing complex, just a continuation of the curves around the outer edge:

Then I appliqued the long edges, joined them to the top and added some extra broderie perse to fill the corners and blend over the seams: 

I hope you like it - I'm very happy how it turned out. The aim was to design a quilt with lots of needleturn applique (because I love it) and to incorporate many different repro feature fabrics - all in brown, tan and gold tonings. Seems right to finish a top in Autumn with these autumnal colours? 

Mostly I use the back basting prep technique for needle turn applique - where accuracy is important. Recently I spotted a good tutorial for this at Scraptherapy blogspot. Just mentioning it as I get asked about this method sometimes and I'm way too lazy to do a tutorial, sorry. 
The applique method for the outer border was a cross between broderie perse and tile quilting ("broderie perse tiling"?) - just pinned and needle turned around the cut edges of the fabric scraps, no accuracy or precise placement needed. 
There were a few fiddly measuring moments (and revisions) along the way, but the outer border was a breeze and very relaxing to stitch. The top finishes at 2 metres square (about 79 inches). 
Off to the hand quilting queue for you!


Remember my 2016 resolution to become a better piecer (the piecing without papers)? I was seated next to an expert hand piecer at a recent Quilt Group meeting and she recommended this book:

It is going to be a favourite for sure - wonderful detailed hand piecing instructions for all sorts of angles and shapes. I used the Easter break to start studying...

...and then, uh-oh, a picture in the book had the pulse racing! A gorgeous antique hexagon quilt made in 1875, maker unknown. You know the feeling...'got to make this one' and 'timing is right for more hexagons'!

I've long been a great fan of Susan at Thimblestitch and her amazing mini EPP hexagon projects - the latest being a mini quilt made entirely with 1/4 inch hexagons. I have a small packet of 1/4 inch papers languishing unused and they are unbelievably small - too small for me! But what size to use for this new quilt? I want to make a mini quilt - relatively mini - and am going to use papers.

A quick check around the house to see what sizes I have used before in my quilts.
3/4 inch hexagons in these three quilts: 


3/4 inch and 3/8 inch hexagons in this one:

1/2 inch hexagons in this one: 

1.25 inch hexagons in this one: 

1 inch hexagons in this one: 


I've decided on 1/2 inch hexagons for the new quilt (called Hexagon Star) - that will make it about 32 inch square finished. There's no pattern but it should be easy enough to work off the photo.
I already have papers, recycled from use in my Ann Randoll quilt. I'm using clips to hold the fabrics around the papers (no glue) ready for thread basting. The basting will not go through the papers. That way I can easily recycle the papers by popping them out once the hexagons are stitched together. Nothing new here but just the method I prefer. 
And the fabric choices? There will be a little bit of fussy cutting but am hoping overall for a scrappy, not-too-organised look, as in the original.  The fabrics will be from my current stash, largely repros and the colours will be cream shirtings, double pinks, pink shirtings, dark browns, reds (dark pink tones) and grey. Always exciting to have a new start isn't it?!

Over the Easter break I managed a little finish - a Sewing pouch. Ready made zip pouches have been a popular decorating project for many quilters and I finally acquired one through Quilt Group. The time was right to set about covering it in clamshells - with 5 inch squares of Regent Street lawns and shot cottons scraps.

I glue basted the clamshells the method I have found works well- Sue Daley's Clamshell method on Youtube.
With a few stitches I tacked the sheet of clams to some backing fabric cut to a rough size to fit the pouch. Then I used some perle cotton to add a little quick quilting. 

The tricky bit was the last bit (always seems to be the way!) - stitching it to the case. It needed to sit snugly in around the braid edges of the case frame (so as not to show the bright red fabric of the case facing). I resorted to a curved needle at this point - much easier to ladder stitch it to the pouch.   


Back to those hexagons .... :)

PS. Funny thing about this new EPP hexagon quilt ...the antique inspiration was pictured in a great book, but one that is all about piecing without papers. Jinny Beyer actually talks about EPP as "cumbersome" and "extremely time consuming" and "rather a waste of time when sewing with cotton fabrics" (not a fan of paper piecing!). So I can only suppose the quilt was hand pieced without papers - pretty amazing. And I wonder if half inch hexies would have been done that way ?? Too tricky for me - I will stick with papers for this one!

Monday, 9 June 2014

Ann Randoll reproduction update

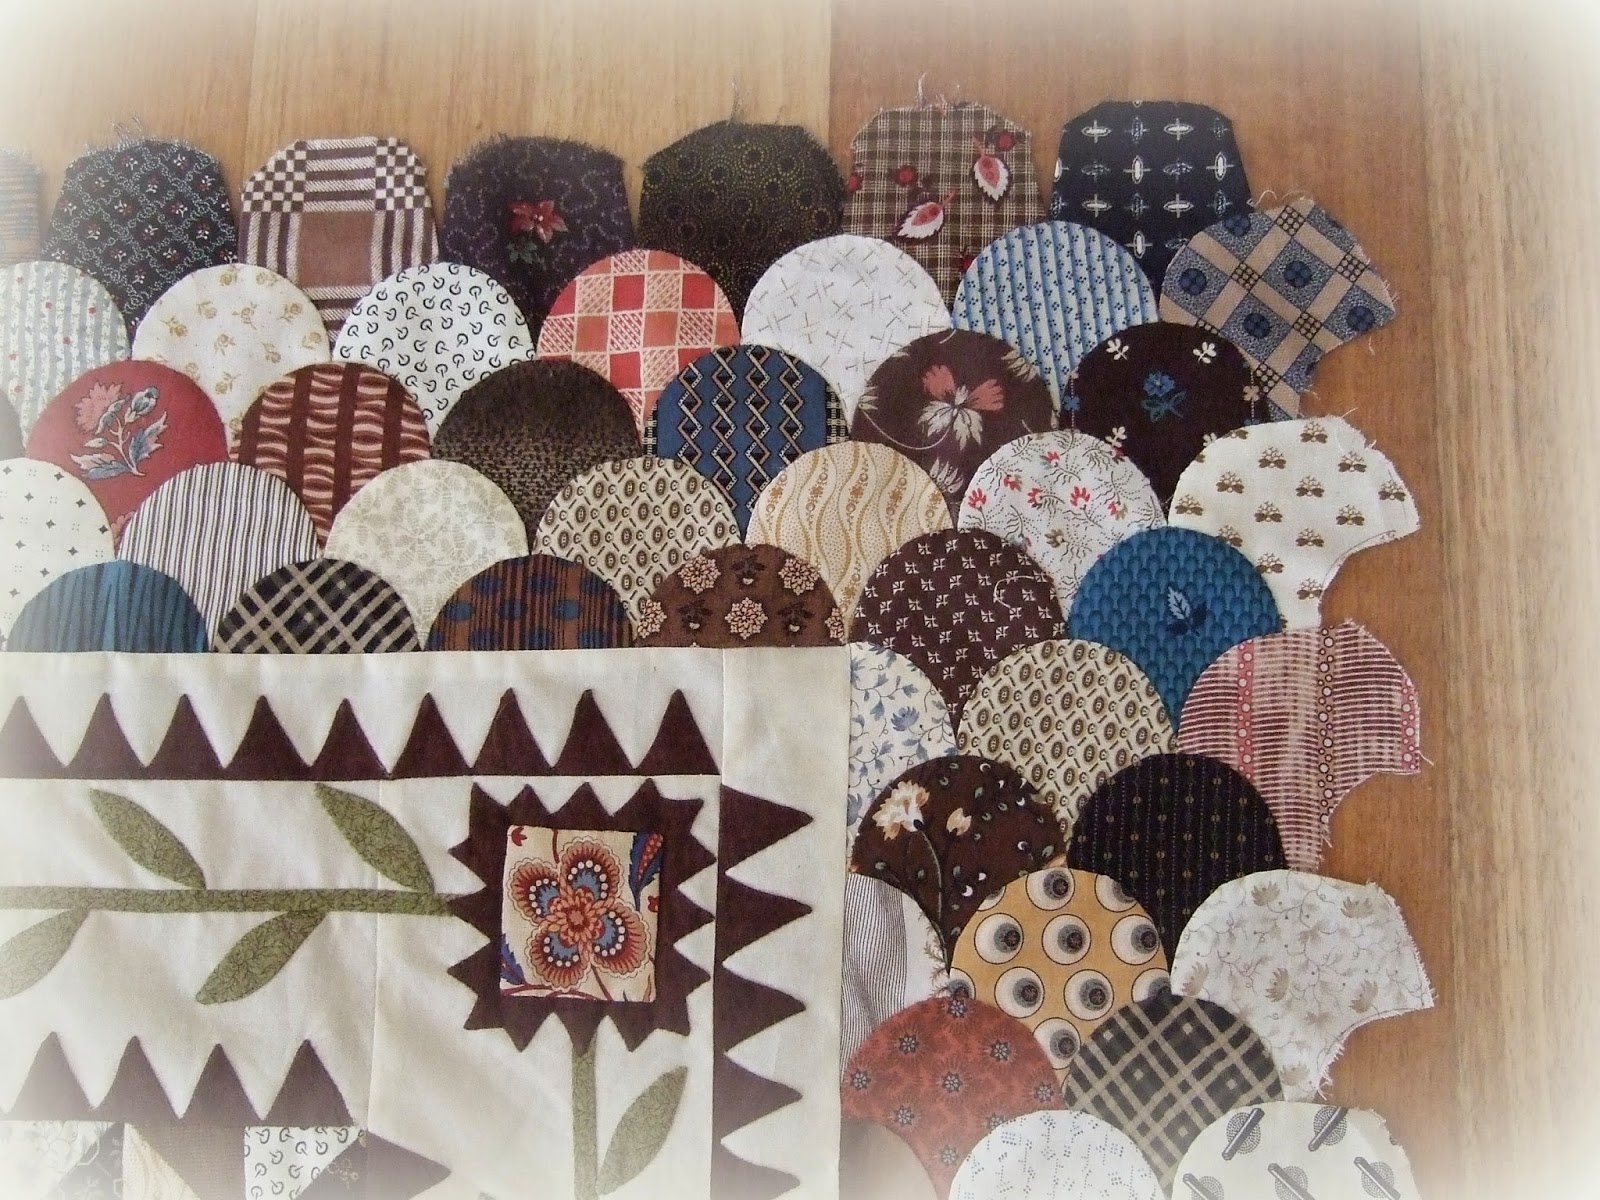
The clamshell borders are on and here's how it looks now:
Now measures about 68" square

I've decided to keep my quilt square in shape - partly because I prefer the look of it, and partly to keep it a more manageable size.  So my clamshell border is narrower top and bottom than the original antique quilt. I have been working from Rhonda Pearce's workshop pattern. She made the wide clamshell border like the original. I think/hope to be able to modify the next border to suit a square shape. Just a reminder - here is a picture of the antique quilt:
Photo from book Quilts 1700-2010  from the V&A
And here are some more photos of the final stages of attaching my clamshell borders. Each border consists of clams entirely hand stitched together- which makes it a bit fragile. So it was a relief to stitch each strip to the quilt - anchored securely with a line of machine stitching.


In the border corners - overlapping the clamshells to fit them together

Ready to hand applique the corner clamshells together, and then remove the last of the papers.

All corners completed:

Hope everyone is getting lots of extra stitching time this long weekend (Queen's Birthday long weekend in Australia). I've been busy garden tidying and have the aching shoulders to prove it. So today there should be some lovely quiet time working on the start of Auntie Green - will post soon. 

Here are the last of my geranium flowers - rescued before I gave the plants a severe winter trimming. Amazing burst of colour!

Monday, 2 June 2014

New month ...new project

New month,  and I am happy to say there are no quilting misadventures to report in this post. Last two posts there were a few 'confession's but I'm (hopefully) over that.

A sure sign of better things -  I received a little parcel from Susan at Thimblestitch  - a win in her giveaway - so beautifully stitched and just what I need for small applique pins!

And I am borrowing Susan's idea of showing my 'family' of pincushions - with the new addition getting friendly with its lumpy cousins. Thanks Susan!

And the New Project?
My newly-engaged daughter spent the day here on Saturday. We had an appointment for her to try wedding dresses....beautiful, vintage-inspired gowns. I don't need to tell any of you mothers of daughters how that felt! or how she looked! 
We also spent time planning the quilt I am making for her wedding (in around 10 months time). She wants very low volume and largely shades of cream and beige. Here are the fabrics she selected from my stash - some plain but a lot have a subtle design or toile. 
And this is the pattern I will use - Auntie Green - Irene Blanck's lovely pattern - all hand applique. 


This design will be very muted in these colours - but she is hoping it may draw you in for a close inspection (squinting through your glasses?) We are thinking that once it is quilted - with outline quilting for emphasis around every shape - the pattern may stand out better and have the overall look of two-tone vintage lace.  
The backing of the quilt will be a plain cream homespun so, once quilted in this way, will look like a whole cloth quilt from the back. The quilt could be used either side up.
I've not done anything like this before but am quite excited to give it a try. And the beauty of lots of scraps of applique is that we could adjust the colour choices as it goes - a bit more or a bit less contrast. So that's the theory....wish me luck.

Ann Randoll progress
The clamshell border is growing steadily. I have used Sue Daley's method of constructing clamshells. It is one of several possible ways to make clamshells, not necessarily the best way - just the way I have found that works very well for me. It does involve glue so I am prepared to give this quilt a good wash.


Clamshells glue-basted ready to applique together in rows
I drew up a grid on paper - just to make sure my rows were staying in line.

One border ready for a photo - papers removed

Clamshell side border sewn to the quilt
Benjamin Biggs  - Block 6 pattern has just been released and ...even more exciting - the border too. I have just printed the 13 pages of this installment and can't wait to get started. 
I see a great deal of applique in my future ... oh goodie!

And what does this photo signify?

I have two quilts accepted to go in the NSW quilt show - in Sydney in July. They are Carolina Lily and Star Bouquet . It is the first time I have entered any Show and I am a bit ambivalent about it. Technically my quilts are far from the superb standard of so many I have seen in the Sydney Show. But I wouldn't mind hearing just which areas need most work. So I entered them for judging - hoping there would be feedback given. I've since heard that doesn't happen. Oh well - I think it is an achievement to have been accepted to exhibit and my family is very excited (much too excited actually!) 

Saturday, 5 April 2014

Clamshell capers

Since I discovered clamshell patchwork last year I have been rather obsessed with them ...and seem to have stitched them at every chance!

This was a first-attempt project last year - appliqued using Sue Daley's paper piecing method - with much reference to the Youtube video in the link.  Starting with this:

Clamshells stitched together
It became this,  using Sue's pattern: 


Since then I have made a clamshell gift pouch for my sister in March, adapting a great tutorial on Janet's blog "Quiltsallott" (thanks Janet!) Starting with a panel of appliqued clamshells, quilted and cut into this shape:

And added binding and zipper to become this:

Still found myself channeling clamshells last month - and made the same pouch for a friend's April birthday. I decided to use some squares of French souleiado that I thought might be her colours. 


Clamshells over papers

Applique row by row


Meanwhile ...I don't know if you remember all the clamshells I made at the end of last year  - to add to the design of my medallion quilt. Here are some pics from previous posts:


Top finished in January
Well, I have got this sandwiched and pinned on the floor ...

...and am quilting it - machine quilting on my domestic machine. I would dearly love to have it hand quilted but my arthritis does not allow this. I want to achieve as close as possible to a hand quilted vintage look so we'll see how it goes.

Quilting in the ditch around all the hand applique:


And now ...I am quilting around the clamshells:


I wonder if I might soon be "over clamshells". Hope not too soon because there is still a rather large border of clamshells to be added to my Ann Randoll quilt in the nearish future - hah!